The TopTablePlanner Blog

World Map Wedding Seating Plans
19th April 2019, by Adam
Guests will be delighted to discover where in the world you have put their table with a world map inspired wedding seating plan.
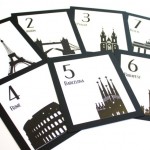
A Landmark Wedding Table Plan
30th April 2018, by Adam
A Landmark wedding seating plan will share your happy memories of romantic holidays in Paris, or strolling hand in hand through New York's Central Park.

London Underground Wedding Table Plan
30th April 2018, by Adam
If London has special significance for you, then a funky London Underground table plan could be perfect for your wedding.

Disney Themed Wedding Seating Plans
27th June 2017, by Adam
We have collected together a selection of ideas full of the magic of Disney, to help you create your very own Disney themed wedding seating plan.

Once Upon A Time… A Fairy Tale Wedding Table Plan
3rd May 2017, by Adam
“Once in a while, right in the middle of an ordinary life, love gives us a fairy tale.” Bring romance and magic to your celebrations with a fairy tale themed wedding seating plan.

The Wedding Planning Journey
4th August 2016, by Adam
Our good friends over at Hitched have collated advice from some of the best in the business in their new step-by-step guide to planning your wedding.

Mirror and Frame Wedding Seating Plans
4th July 2016, by Adam
Versatile, funky and right on trend, mirrors and picture frames can turn your wedding seating plan into an instant work of art.

9 Apps and Websites for Stress-Free Wedding Planning
19th February 2016, by Adam
There's an App for that! We look at how you can use software, websites and apps to make your wedding planning organised, efficient and fun.

Silver Themed Wedding Seating Plans
3rd February 2016, by Adam
Silver can be cool, stylish and luxurious, or glitzy, glam and sparkling. Whichever you prefer, there are plenty of options for your silver themed wedding seating plan design.
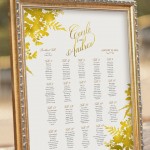
Gold Themed Wedding Seating Plans
12th January 2016, by Adam
From glittering opulence to retro vintage, gold can be used in so many ways in your wedding seating plan!
